Wednesday, March 31, 2010

Container Chick!

Project - Container Chick - This is an old project that Connor did when he was only 2 years old. It is really simple and it recycles your plastic applesauce containers! Directions: Paint a plastic applesauce container yellow, Connor did this with some help from me, glue googly eyes and orange paper beak, glue yellow pom poms on the top of the container.
Materials Needed - old plastic applesauce container, yellow paint, googly eyes, orange construction paper, craft glue, paint brush, scissors


Tuesday, March 30, 2010

Craft Stick Chick!

Day 2 of the Week - The theme this week is Easter. The letters of the week are k, M, m.
Project - Craft Stick Chick - I saw this craft on the site www.allfreecrafts.com/easter/chick-sticks.shtml Directions: paint a large craft stick yellow, let it dry. Glue googly eyes and an orange beak to the front, glue yellow feathers to the back of the painted stick.
Materials Needed - yellow paint, large craft stick, yellow feathers, googly eyes, orange construction paper, glue, paint brush, scissors

Learning Activities
Today's Activities:
Numbers - counting pennies, writing numbers
Pre-Reading Skills - reasoning
Beginning Sounds - writing beginning consonant sounds, recognition
Ending Sounds - recognition, writing ending sounds
Writing Letters -Uppercase M

Monday, March 29, 2010

Bunny Ears!

Day 1 of the Week - The theme this week is Easter. The letters of the week are k, M, m.
Project - Bunny Ears - I cut a piece of tag board into 3, 3-4 inch strips (1 for each child), I measured Connor, Addie and Lauren's heads and stapled each strip accordingly to form a ring. I drew bunny ears and cut them out of the white tag board. I drew pink insides for the ears on pink construction paper and cut them out. Connor and Lauren assembled their ears and I helped each of them staple the finished ears to the ring. This was a very simple craft - but the kids loved wearing their ears. As soon as their ears were complete they took turns being the Easter Bunny, by gathering all of our plastic Easter Eggs and playing Egg Hunt!! Addie even loved wearing her ears! Materials Needed - white tag board, pink construction paper, scissors, stapler, glue stick
Addie the Bunny!

Learning Activities
Today's Activities:
Numbers - counting pennies, writing numbers
Pre-Reading Skills - reasoning
Beginning Sounds - writing beginning consonant sounds, recognition
Ending Sounds - recognition, writing ending sounds
Writing Letters -Lowercase k

Thursday, March 25, 2010

Friday Follow!

Happy Friday Follow Everyone! I am loving Fridays. I have found many wonderful blogs through Friday Follow and many great followers too. Thanks and enjoy!

MckLinky Blog Hop


Hand Print Chick!

Day 3 of the week - The theme this week is Easter. The letters of the week are A, a, K.
Project - Hand print Chick- I saw this project on the website http://www.crafts.kaboose.com/easter-chick-card.html I printed off the templates and traced the oval shape onto yellow construction paper and the legs and beak onto orange construction paper. Then, I traced Connor and Lauren's hands onto yellow construction paper and cut the hands out. Connor and Lauren cut the oval body shape, legs and beak and glued the legs onto the yellow oval body. Then, they folded the beak in half and glued one half of it onto the yellow oval, so the other half was left sticking up. They added googly eyes and I helped them attach their hand prints to the body with brad fasteners. I am going to have them write Happy Easter on the bottom part of the chick too. *I forgot to have them do this* Materials Needed - scissors, googly eyes, yellow and orange construction paper, brad fasteners.
Learning Activities
Today's Activities:

Numbers - counting, recognition, writing, greater and less
Pre-Reading Skills - reasoning
Beginning Sounds - writing beginning consonant sounds, recognition
Colors -color review
Writing Letters -Uppercase K

Wednesday, March 24, 2010

Easter Projects!

Here are some Easter Crafts from last year. I thought I would repost them - enjoy!
Heart Shaped Easter Bunny

Project - Heart Shape Easter Bunny. I found this Easter craft on the website 
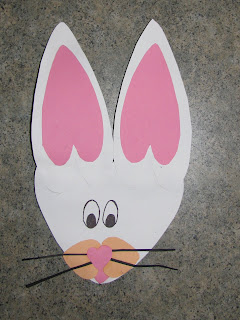
http://www.first-school.ws/activities/shapes/animals/rabbit_hare_hearts.htm I printed the templates for the bunny in black and white and traced them onto colored construction paper. I cut out the pieces for Connor and Lauren. They assembled the bunny themselves. I used googly eyes for Lauren's bunny and I drew the eyes for Connor's bunny :) I made the whiskers out of thin strips of black paper. Below are the suggested steps for assembling the bunny.
1. Glue inner ears to ears. 2. Glue assembled ears to head. 3. Glue eyes as one piece 4. Glue tongue heart 5. Glue heart "cheeks" over tongue 6. Glue nose heart over "cheeks"
Materials needed - white construction paper, pink construction paper, tan or beige construction paper, googly eyes, glue, black construction paper, or pipe cleaners . . . for whiskers, scissors, templates from above website.

Handprint Cotton Ball Sheep
Project - Handprint Cotton Ball Sheep. I found this craft on the website http://www.first-school.ws/activities/crafts/animals/farm/handprint-lamb.htm First, Connor and Lauren pressed their hands in black paint and pressed them on a piece of cardstock. Then, I printed the sheep template off of the above website. Connor and Lauren colored the face of the sheep with markers. Then they glued cotton balls onto the sheep body. After the handprint paint dried Connor and Lauren glued the sheep body on the palm of the handprint.
Materials needed -cardstock, sheep template, cotton balls, markers, black paint and glue.

Handprint Bunny Poem!
. m Project - Handprint Bunny poem. I am not sure where I found this idea, but I had the poem filed away in my craft folder. I typed the poem on the computer and printed it out. Connor and Lauren then pressed their hand into paint - I used a pastel green - Then they signed their name. After the paint dried, I drew bunny faces and ears on each finger. This craft makes great Easter cards, or presents for Grandparents. Materials needed - paint, fine-tip markers, poem, paper.
Here is the poem:
Five little Easter bunnies sitting in a row;
They are made of my very own fingerprints, you know.
Five little Easter bunnies are hopping to say,
Love and kisses from me on this happy Easter day.
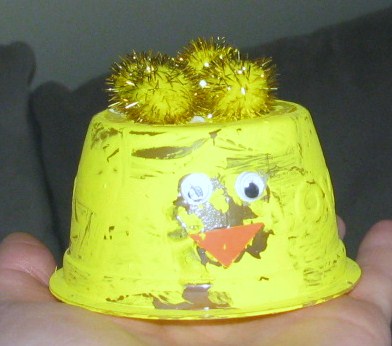
Tuesday, March 23, 2010

Plastic Egg Bunny!

Day 2 of the week - The theme this week is Easter. The letters of the week are A, a, K.
Project - Plastic Egg Bunny- I saw this project on http://www.enchantedlearning.com/crafts/easter/eggbunny/ Connor and Lauren have always loved playing with the plastic Easter eggs, so I thought this would be a perfect project for them. Directions: Cut two large white bunny ears out of white foam. Cut two smaller pink ears that will fit inside the white ears. Glue the smaller pink pieces inside the white pieces. Glue the ears to the top of the small of end of the egg. Glue googly eyes below the ears and two white pompoms on the front of the egg -right above where the egg opens up. Then glue the pink pompom between the white pompoms. Let dry. *I used hot glue, so I had to help Connor and Lauren with the gluing.** Materials Needed - plastic Easter eggs, 2 medium white pompoms, 1 small pink pompom, white and pink foam, hot glue, scissors, googly eyes.
Learning Activities
Today's Activities:
Numbers - counting, recognition, writing, ordering
Pre-Reading Skills - relationships
Beginning Sounds - Consonant Review, beginning consonant sounds recognition
Ending Sounds - recognition, writing
Colors -color review
Writing Letters -Lowercase a

Monday, March 22, 2010

Tangram Bunny!

Day 1 of the week - The theme this week is Easter. The letters of the week are A, a, K.
Project - Tangram Bunny - I saw this project in the March 2008 issue of Family Fun Magazine. I drew the tangram templates onto 4 x 4 pieces of light yellow card stock and cut them out. Connor and Lauren arranged the tangram pieces on blue card stock - following the bunny designs (there are 3 different designs). I had to help them make the bunny - it was difficult for them. Then, they glued the pieces onto the blue card stock and added googly eyes, pom pom noses and pom pom tails. Materials Needed - card stock, scissors, googly eyes, pom poms, glue stick, tangram directions (from www.Familyfun.com/magazine and search for Bunny Tangrams)

Learning Activities
Today's Activities:
Numbers - counting, recognition, writing, ordering
Pre-Reading Skills - Story Order
Beginning Sounds - Consonant Review, writing beginning consonant sounds
Colors -color review
Writing Letters -Uppercase A

Thursday, March 18, 2010

Paper Plate Duck

Day 4 of the week. Our Theme this week is The Farm! This weeks posts are re posts from last year. You can check out all of the Farm unit projects/learning activities under the Farm label! The Farm post was only my second post and I was still playing with what kind of format/style I wanted to use, so I just made one large post for two weeks worth of crafts/learning activities. This is why I thought I would redo the farm crafts in separate posts this week.
Project- Paper Plate Duck- Connor and Lauren made a paper plate duck which incorporated their handprints! I got this idea from the website
http://www.first-school.ws/theme/animals.htm This site has templates you can use. I used a paper plate that Connor and Lauren painted yellow. I drew my own beak and feet and traced Connor and Lauren's hands. Materials needed - paper plate, yellow construction paper, orange construction paper, yellow paint, googly eyes, glue and a stapler (the above website has templates for the beak, feet and head).
Directions: Connor and Lauren painted a paper plate yellow. Then, I folded the paper plate in half so the color showed on both sides. I drew feet and a beak on orange construction paper and a round head on yellow construction paper and I traced their hands yellow construction paper and cut every piece out. The website has templates you can use. I folded the middle part of the feet up into the folded plate and stapled. Connor and Lauren glued the folded beak piece onto the head piece. Then they glued large googly eyes onto the head above the beak. Then Connor and Lauren glued the head on the side top corner of the body(the plate). Finally, I took their traced handprints and stapled them to the other top corner (for the feathers)!

Wednesday, March 17, 2010

Bean Farm Scene

Day 3 of the week. Our Theme this week is The Farm! This weeks posts are re posts from last year. You can check out all of the Farm unit projects/learning activities under the Farm label! The Farm post was only my second post and I was still playing with what kind of format/style I wanted to use, so I just made one large post for two weeks worth of crafts/learning activities. This is why I thought I would redo the farm crafts in separate posts this week.
Project- Bean Farm Scene- Connor and Lauren drew a farm scene on a piece of cardstock. Then I traced over their drawings with White Elmers glue and they placed beans on the glue. The beans outlined their drawings. They loved drawing their pictures and watching them "pop" with the beans. Materials needed- cardstock or heavy construction paper, markers, Elmers glue or craft glue, beans or seeds.

Tuesday, March 16, 2010

Paper Plate Pig

Day 2 of the week. Our Theme this week is The Farm! This weeks posts are re posts from last year. You can check out all of the Farm unit projects/learning activities under the Farm label! The Farm post was only my second post and I was still playing with what kind of format/style I wanted to use, so I just made one large post for two weeks worth of crafts/learning activities. This is why I thought I would redo the farm crafts in separate posts this week.

Project Paper Plate Pig - Connor and Lauren loved this project. Materials needed: 2 paper plates (1 large- for the body, 1 small-for the head (or cut one of the plates smaller), light pink construction paper or card stock -for the nose and ears, pink paint Black permanent marker, pink pipe cleaner.
Directions:Connor and Lauren painted both the regular and small paper plates pink. When the paint was dry they glued the small plate in the middle of the larger plate. I cut out a small pink circle out of paper along with triangle ears. They then glued the small pink paper circle for the nose to the middle of the small plate. They added eyes, nostrils and a mouth with a black marker. Finally, they glued on pink paper triangles for the ears. I curled the pink pipe cleaner for the tail and punched a hole in the top of the larger paper plate to thread the tail through. I let the kids choose where they wanted the tail to go!! I got the idea for this project from the website http://www.pre-kpages.com/farm.html under the farm theme link.

Monday, March 15, 2010

Hand print Rooster Puppet

Day 1 of the week. Our Theme this week is The Farm! This weeks posts are re posts from last year. You can check out all of the Farm unit projects/learning activities under the Farm label! The Farm post was only my second post and I was still playing with what kind of format/style I wanted to use, so I just made one large post for two weeks worth of crafts/learning activities. This is why I thought I would redo the farm crafts in separate posts this week.
Project Hand print Rooster Puppet - I found the idea for this project on the website http://www.first-school.ws/theme/animals.htm under the animal link and then the bird link. This site even provides templates for you to print, but it is an easy project to do without a template. Materials needed: white card stock or paper, red paper, yellow paper, large Popsicle sticks, glue and googly eyes.
Directions:I traced Connor and Lauren's hands on red card stock (for the wattle and crest) and cut them out. I cut out two small triangles for the beak on yellow card stock. (The template provides the triangle and circle) I cut out the circle head on white card stock. Connor and Lauren glued one of their hand prints on the top of the circular head and the other on the bottom of the head. Then they glued the yellow triangles on the side of the head and finished it off by gluing on a googly eye. Finally, I helped them glue their rooster head to the large Popsicle stick. They had fun doing puppet shows with their rooster.

Thursday, March 11, 2010

Painted Shamrock!

Day 3 of the week - The theme this week is St. Patrick's Day. The letters of the week are s, U, u the number of the week is 15.
Project - Painted Shamrock- Directions - I traced a shamrock template onto white card stock. Connor and Lauren painted the shamrock green and sprinkled silver and green glitter onto the wet paint. Then, they wrote the word Shamrock on the bottom of the paper. I wanted to work on painting and staying in the lines while painting. They did a great job. I really emphasized giving your best effort, taking pride in work, and trying! Addie also painted a shamrock, after she woke up from her nap. She did a great job - she did end up painting the counter and my hand! Materials Needed - white card stock, shamrock template, green paint, paintbrushes, silver and green glitter, green marker
Addie's finished Shamrock
Connor and Lauren painting
Addie painting!
Lauren and Connor's finished projects!
Learning Activities
Today's Activities:
Numbers - 15, 11, 12, counting, recognition, writing, ordering
Pre-Reading Skills - Story Order
Beginning Sounds - Consonant Review, writing beginning consonant sounds
Colors -color review
Writing Letters -Lowercase u

Wednesday, March 10, 2010

Shamrock stamping!


Project - Shamrock Stamping - This is a project from 3 years ago. Connor was only 2 when we did this - he will be 5 next week!!!!! Directions - Dip a shamrock cookie cutter into green paint and press onto white construction paper. Mount dried paper onto larger green construction paper! I remember Connor and Lauren making a mess with this project, but also having a lot of fun dipping the shamrock cookie cutter into the green paint!
Materials Needed- white and green construction paper, green paint, shamrock cookie cutter

Sunshine Award!

I received my first award! Thank you, thank you to Mandy over at http://mandypmommyof4.blogspot.com/ she is blogging friend and has a wonderful blog -check it out. She sure is busy with 4 kids under the age of 4!

Now all I have to do is follow the following five steps! I hope I can do this. I am fairly new to the blogging world - so I will give it a shot.

1) Put the logo within my blog or on my post
2) Pass the award onto 12 fellow bloggers
3) Link the nominees within my post
4) Let the nominees know they have received this award by commenting on their blog
5) Share the love and link to the person whom you received this award from

Here are the nominees (I can't promise that I will give out 12 awards, but I will do my best!)

1. Kinsey at http://idontwhy.blogspot.com/ She is really new to the blogging world. Her blog will make you laugh, it always makes me laugh! - check it out. I may be a little bias - she is my sister, but I think she is hilarious and a great writer too!

2. Elise at http://etadventures.blogspot.com/ she has been a wonderful follower for me - thanks for the comments! She does learning activities and projects with her 2 little ones. I love to see what other mom's are doing with their kids!

3. Mother Plus Teacher at http://motherandteacher.blogspot.com/ she has been a great follower for me too. Thanks for all of the comments. Check out her blog - she homeschools her children (4 of them and 1 on the way) Talk about busy!

4. http://amommytalks.blogspot.com/ I am so luck to be a part of We Teach http://weteach.ning.com/ a place for anyone who teaches! This is where I found this blog. She is a former teacher now SAHM - like me. She does great activities with her little one!

5. http://imafulltimemummy.blogspot.com/ I am so happy to be a follower of this blog. She blogs about being a full time mommy and every or anything else!

6. To Ariana at http://crowroosterscrow.blogspot.com/ her blog brightens my day with her beautiful photos and simple posts! I just love everything about her blog!

Tuesday, March 9, 2010

Shamrock Beaded Necklace!

Day 2 of the week - The theme this week is St. Patrick's Day. The letters of the week are s, U, u the number of the week is 15.
Project - Shamrock Beaded Necklace- Directions - Cut green ribbon large enough to slip on and off child's neck. String green and white beads onto green ribbon (I had Connor and Lauren make a pattern), Cut a small shamrock pattern out of green craft foam, once you are halfway punch two holes in the side leaves of the shamrock and thread ribbon through the holes, finish stringing the last half of the beads onto the ribbon, Tie a knot to make a necklace. *Connor made a necklace, but he refused to wear it! He is such a boy!!!! Addie is modeling his necklace in the picture along with Lauren. I saw a variation of this craft at http://www.prekinders.com under the St. Patrick's Day Theme. Materials Needed - green ribbon, green and white beads, green foam, scissors, hole punch
Learning Activities:
Today's Activities:
Numbers - 15, 11, 12, counting, recognition
Pre-Reading Skills - cause and effect
Beginning Sounds - Consonant Review, writing beginning consonant sounds
Colors -color review
Writing Letters -Uppercase U

Monday, March 8, 2010

Dimensional Shamrock!

Day 1 of the week - The theme this week is St. Patrick's Day. The letters of the week are s, U, u the number of the week is 15.

Project - Dimensional Shamrock - I saw this project on http://www.thebestkidsbooksite.com/st.patricksday.crafts.cfm under Dimensional Shamrock. Directions - Trace shamrock template (from the website) onto green card stock. Cut out the 2 shamrock shapes (Connor and Lauren did their own cutting). Cut slits into the shamrocks (the templates show where to cut the slits), decorate the cut out shamrock's with glitter, buttons . . ., slip shamrocks into place to create dimensional shamrock. **Decorate both sides of the shamrocks - we did not do this. The finished product will look much nicer if both sides are decorated!*** Materials Needed - green card stock, scissors, shamrock template, glue, glitter, buttons


Learning Activities: Today's Activities:
Numbers - 15, how many, counting, one-to-one matching

Pre-reading skills - patterns

Beginning Sounds - Consonant Review

Colors -black
Writing Letters -Lowercase s

Thursday, March 4, 2010

Three Pig Houses!


Day 3 of the week - The theme this week is The Three Pigs. The letters of the week are Q, q, S the number of the week is 14.
Project - Three Pig Houses - I saw this project on http://www.prekinders.com/ under the Fairy Tales Theme. Directions - First, Connor and Lauren retold The Three Little Pigs story - emphasizing the order of the houses. Next, they each drew three houses with a pencil. Then, they glued straw (raphia), sticks (toothpicks), bricks (red construction paper cut into rectangles) onto each house, in the correct sequence. As finishing touches, they drew three pigs, a wolf and wrote "3 Little Pigs" on each of their papers. Materials Needed - white card stock, glue, pencil, raphia, toothpicks, red construction paper, scissors, markers
Connor "building" his stick house

Connor drawing the pigs
Learning Activities:
Today's Activities:
Numbers - 14, 9, 10, writing, counting, one-to-one matching
Reading Readiness - senses - hearing, emotion identification
Beginning Sounds - Consonant Review
Colors -Green
Writing Letters -Uppercase S

Tuesday, March 2, 2010

Egg Carton Wolf Nose!

Day 2 of the week - The theme this week is The Three Pigs. The letters of the week are Q, q, S the number of the week is 14.
Egg Carton Wolf Nose- I had another craft planned, but Connor and Lauren wanted to make wolf noses to go along with their little pig noses from yesterday. So, I created wolf noses made out of an egg carton! They had fun acting out the story with their pig and wolf noses! Directions: Cut 2 snouts out of an egg carton, paint the front part of the egg carton a dark gray (a circle shape), Let dry. Draw small circles on the side of the carton with permanent marker. Poke small holes and string pieces of fishing line through the holes (the whiskers) secure with tape on the inside - (I used a needle to poke the holes), Attach elastic with tape or staples ( I used the elastic from old birthday party hats). Materials Needed - egg carton, gray paint, paint brush, black permanent marker, fishing line, needle, elastic, tape or stapler, scissors
Learning Activities:
Today's Activities:
Numbers - 14, 9, 10, writing, counting
Reading Readiness - senses - tasting, touching, smelling
Beginning Sounds - Consonant Review
Colors -Green
Writing Letters -Lowercase q

Monday, March 1, 2010

Egg Carton Pig Snout!

Day 1 of the week - The theme this week is The Three Pigs. The letters of the week are Q, q, S the number of the week is 14.
Egg Carton Pig Snout- I usually have our weekly theme planned out ahead of time, or at the very least planned in my head - this week is the exception. I just couldn't decide what the theme should be. We read the book The Three Little Pigs (which the kids love), and I thought it would make a great theme for this week. Then I found out that March 1st is National Pig Day! What a coincidence. I saw the idea for the egg carton pig snout somewhere a while ago, and this ended up being our 1st project this week. Directions: Cut 2 snouts out of an egg carton, paint the egg carton pink. Let dry. Draw 2 circles with black permanent marker (the nostrils). Attach elastic with tape or staples ( I used the elastic from old birthday party hats). Materials Needed - egg carton, pink paint, paint brush, black permanent marker, elastic, tape or stapler, scissors
Learning Activities:
Today's Activities:

Numbers - 14, 7, 8, number review 5-8
Reading Readiness - between, left, right, summer, winter
Beginning Sounds - Consonant Review
Colors -Orange
Writing Letters -Uppercase Q