Thursday, December 23, 2010

1st year of school ornament

The theme this week is Christmas!
Project: 1st Year of School Ornament! This year is Connor's 1st year in school - kindergarten. I wanted to find him an ornament to remember his 1st year of school, but I just couldn't find one! My mom suggested that I make my own. So, I glued together 4 crayons, and took the pin off of my old school bus pin (from when I was younger) and glued the school bus to the top part of the 4 crayons. Finally, I glued a ribbon to the back of the crayons for hanging. I think it turned out really cute.

Wednesday, December 22, 2010

Christmas Melted Crayons!!

The theme this week is Christmas!
Project: Christmas Melted Crayons - I volunteer in Connor's kindergarten class once a week. I was looking for something "special" to give to each child in his class for Christmas. I remembered that we had a Christmas cookie pan and a bunch of old crayon pieces, so I thought it would be cute to melt all of the crayons into cute Christmas crayons. I am so glad I tried this - they turned out great. Connor and I removed the wrappers from the broken crayons and placed the stripped down crayon pieces into each section of the pan. I then put the pan into the 250 degree pan for about 20-30 minutes. I let them cool and then flipped the finished crayons out of the pan

Tuesday, December 21, 2010

Oh Christmas Tree!

The theme this week is Christmas!
Project: Oh Christmas Tree! I drew a Christmas tree on green construction paper. Ty and Addie used sequins and beads to decorate their individual trees! Materials Needed: green construction paper, marker, craft glue, beads, sequins

Thursday, December 16, 2010

Christmas Placemats!

The theme this week is Christmas!!
Project: Christmas Placemats! Ty and Addie had so much fun making and using their Thanksgiving placemats, that Ty requested making Christmas placemats! So, I gave them a white piece of construction paper, cut-out pieces to a reindeer and a Christmas tree and they assembled the parts. I helped them with their reindeer's antlers, but they each added their own individual touches to their placemats. I also gave them Christmas stickers, so they could add a little more their placemats. When they were done, I glued the white placemats to green and red construction paper and used Con-Tact paper to seal/laminate the placemats into more durable and usable placemats!! I think they turned out really cute!!

Materials Needed: white, green and red construction paper, glue sticks, scissors, stickers, markers, and any kind of Christmas craft you want to have on the placemat, Con-Tact paper

Wednesday, December 15, 2010

Snowman Face Ornament!


The theme this week is Christmas!!
Project: Snowman Face Ornament! I saw this project a while back in Family Fun Magazine. Take the key ring off of a round, paper, circle key chain. Glue on a black, craft foam hat. Use permanent marker to make 2 eyes, and dots for the snowman's mouth. Use orange marker to make a carrot nose. Attach a ribbon for hanging!! Materials Needed: key ring holder, black craft foam, ribbon, craft glue, black permanent marker, orange marker

Sunday, December 12, 2010

Craft Stick Rudolph Ornament!

The theme this week is Christmas!
Project: Craft Stick Rudolph Ornament!! Glue two large craft stick together to form a V. Glue the remaining craft stick vertically across the open part of the V - leaving about an inch on each end of the craft sticks. Glue a red pom- pom on the tip of the V - for Rudolph's nose. Add googly eyes and a ribbon for hanging. *** optional*** You can also paint the craft sticks brown! Materials Needed: 3 large craft sticks, craft glue, googly eyes, red pom-pom, red or green ribbon

Saturday, December 11, 2010

Bead Candy Canes!


** I am reposting this project from last year, because Ty and Addie made beaded candy canes this week, so it is was a new craft for the two of them. Ty and Addie added green to the red and clear beads to make their candy canes extra special!!

Day 1 of the week - The theme this week is Christmas Sweets. The letter of the week is X, x. Project - Connor and Lauren strung red and white beads onto chenille stems. I bent the ends of the chenille stems to secure the beads. Materials Needed - chenille stems, red and white beads (tri or regular beads).
Learning Activities - I have been using the workbook Everything for Early Learning Preschool workbook. (I purchased it at Wal-Mart)
Today's Activities:
The letter X, x - writing, recognition
Number Review - counting, following directions, ordering, writing

Tuesday, December 7, 2010

Craft Stick Beaded Christmas Tree!


This is a repost from last year, but I made the tree's again this year with Addie and Ty. Instead of using all long sticks, I cut the sticks so they were staggered - to better resemble a Christmas tree! We also used tri-beads for the ornaments! Addie and Ty had a lot of fun gluing on the beads - they turned out great!!!!
Day 2 of the week - The theme this week is Christmas Trees. The letter of the week is W, w.
Project - Craft Stick Beaded Christmas Tree - Connor and Lauren glued 4 green craft sticks together (1 as the trunk the other 3 as the branches). They glued a foam yellow star on the top of the tree and glued on colored beads for ornaments/lights. I added a piece of ribbon so the tree can be an ornament. Materials Needed - 4 green craft sticks, craft glue, yellow foam star, beads, ribbon

Learning Activities - I have been using the workbook Everything for Early Learning Preschool workbook. (I purchased it at Wal-Mart)
Today's Activities:
The letter W, w - writing, recognition, beginning sound
Number Review - counting, following directions,


Monday, December 6, 2010

Paper Plate Wreath

The theme this week is Christmas!
Project: Paper Plate Wreath! Cut the inside circle of a large paper plate out. Paint the paper plate green. Press red construction paper circles onto the wet paint (for holly berries). When the paint is dry add a festive ribbon! Materials Needed: paper plate, scissors, green paint, paint brush, red construction paper, ribbon

Wednesday, December 1, 2010

Handprint Santa!


The theme this week is Christmas!
Project: Handprint Santa! I painted Ty and Addie's individual hands white. They pressed their individual hands onto green paper. They glued a red Santa hat 2 inches above the white palm. They dipped their thumbs into white paint and pressed their thumbs on the rim of each hat (for white trim) and on the tip of the hat (for the ball). They pressed their thumbs into red paint and pressed it on the paper for Santa's nose. Next, they pressed their thumbs in pink paint and pressed them on the paper for Santa's rosy cheeks. Next, they glued on two googly eyes. When the white paint was dry, they added a mouth by pressing their pointer finger onto a black ink pad. *I saw this craft a couple of years ago in Family Fun Magazine**
Materials Needed: green paper, red paper, white, red and pink paint, googly eyes, glue

Tuesday, November 23, 2010

Thanksgiving Placemat!

Addie's Placemat
Ty's Placemat

The theme this week is Thanksgiving!
Project: Thanksgiving Placemat! Ty and Addie constructed their very own construction paper Turkeys out of pre-cut pieces. They glued the pieces to white paper. Next, I painted Ty and Addie's hands with water color paint to make a turkey. I painted each of their palms and thumbs brown, and their remaining fingers different colors. Then they each pressed their hands onto the same white paper as their construction paper turkeys. I added feet and a beak. Ty and Addie gave each of their turkey's one eye with black marker. Ty and I added letter stickers to spell Gobble, gobble. We also added leaf stickers. I wrote Gobble, gobble on Addie's paper with orange marker. We glued the white paper onto colored card stock. Finally I used Contact paper to seal/laminate the placemats! Ty was sooooo excited to use his placemat!
Materials Needed: white paper, colored cardstock, glue stick, brown, red, orange, yellow construction paper, scissors, orange marker. leaf and letter stickers, water color paints, black marker, paint brush, contact paper

Turkey Turkey!!

Ty's Turkey!!
The theme this week is Thanksgiving!
Project: Turkey made from a oatmeal container. I covered an oatmeal canister with brown construction paper. Ty glued on yellow craft foam feet for the turkey and brown, craft foam wings. We covered a foam ball with an old brown sock for the turkey's head and hot glued it to the cover of the oatmeal container. Then we covered a sour cream container with brown paper and glued it to a circle shape piece of brown, craft foam for the turkeys hat. Ty glued googly eyes and a yellow, craft foam beak to the turkeys head!

Sunday, November 21, 2010

Turkey Puppet!

This is a repost from last year!
Day 3 of the week - The theme this week is Turkeys. The letter of the week is S, s and the number of the week is 17.
Project - Turkey Puppet - I saw this project in the November 2005 issue of Parents Magazine. Connor and Lauren love playing with puppets, so this was a perfect project for them. Directions: Use a 5 1/8 brown circle scallop card, or cut your own from card stock using scalloped scissors - this is what I did. Trace a leaf four or five times onto colored paper (we used dark orange). Cut each leaf out. Add glue, then glitter to the leaves (Connor and Lauren applied the glue with a paint brush, but they left of the stem of each leaf bare for easier gluing. They used a variety of glitter colors) - let dry. Glue leaves to the back of the paper circle with glittered sides facing up. Cut out a wattle and beak. Glue the wattle and beak to the circle and glue on googly eyes. Glue a large craft stick to the back of the circle. Materials needed - dark brown scallop card or card stock, scalloped scissors, dark orange card stock - or any color for the leaves, red card stock, yellow card stock, scissors, glue, paintbrush, large craft stick, colored glitter, googly eyes
Learning Activities - I have been using the workbook Everything for Early Learning Preschool workbook. (I purchased it at Wal-Mart)
Today's Activities:
The letter S, s- recognition, and beginning sound
The number 17 - recognition and writing
Number Review - recognition, ordering, following directions, cutting and pasting

Saturday, November 20, 2010

Coffee Filter Turkey!

This is a repost from last year!
Day 3 of the week - The theme this week is Turkeys. The letter of the week is T, t and the number of the week is 18.
Project - Coffee Filter Turkey - Connor and Lauren used watercolor paints to paint a coffee filter. I drew 1 large circle and 1 medium circle on brown construction paper. Connor and Lauren cut the circles out and glued them one on top of the other onto the dried coffee filter. I cut beaks out of orange construction paper. Connor and Lauren each glued a beak onto the smaller brown circle and added google eyes. Then they glued the finished product onto a colored piece of construction paper. Materials Needed - coffee filter, watercolor paints and brush, brown and orange construction paper, pencil, scissors, googly eyes, 1 piece of any colored construction paper.
Learning Activities - I have been using the workbook Everything for Early Learning Preschool workbook. (I purchased it at Wal-Mart)
Today's Activities:
The letter T, t- recognition, and beginning sound
The number 18- recognition and writing
Number Review - recognition, ordering, following directions, cutting and pasting

Friday, November 19, 2010

Thankful Turkey!

This is a repost from last year!
Day 3 of the week - The theme this week is Thanksgiving. The letter of the week is U, u and the number of the week is 19.
Project - Thankful Turkey - I cut out an upper half of a body (for the turkey) out of brown paper along with a beak out of orange paper. I traced feather shaped patterns onto red, green, orange and yellow paper and Connor and Lauren cut each cut out 4 feathers. I wrote I am thankful for. . . . . on the top of each piece of construction paper. Connor and Lauren glued the turkey body onto their construction paper. They glued the beak onto their turkey and added googly eyes. Next, they brainstormed what they were thankful for and I wrote each of their four things on a piece of paper. They copied the 4 "thankful" words onto each of their turkey feathers. Then, they glued the feathers behind their turkey body. Materials needed - construction paper, brown, green, yellow, red, orange construction paper, googly eyes, scissors, glue, markers
Learning Activities - I have been using the workbook Everything for Early Learning Preschool workbook. (I purchased it at Wal-Mart)
Today's Activities:
The letter U, u - recognition, and beginning sound
The number 19- recognition and writing
Number Review - recognition, counting, following directions, cutting and pasting

Thursday, November 18, 2010

Beaded Indian Corn

This is a repost from last year! We made this Indian Corn again this year as gifts for Grandparents!!
Day 2 of the week - The theme this week is Thanksgiving. The letter of the week is U, u and the number of the week is 19
Project - Beaded Indian Corn - Directions - Cut a chenille stem in half and form and x. Wrap one stem around the center of the x twice, leaving a short length of the stem. Bend the three remaining stems to form an Indian corn shape. Connor and Lauren's turn - string beads on each of the three long stems, alternating colors. Bend the end of each stem to secure. (I let Connor and Lauren pattern their own beads - they did a different pattern for each stem). My turn again - Knot a piece of raffia around the short stem. (You can attach a magnet on the back if you want). Materials Needed - scissors, 12-inch chenille stem, tri-beads - red, gold, orange, brown, yellow, clear, Raffia, glue - to help with attaching the Raffia, magnet - optional.
Learning Activities - I have been using the workbook Everything for Early Learning Preschool workbook. (I purchased it at Wal-Mart)
Today's Activities:
The letter U, u- writing, recognition, following directions
The number 19- recognition, writing, counting
Number Review - recognition, counting, ordering, following directions, writing


Wednesday, November 17, 2010

Painted Turkey!

The theme this week is Thanksgiving!
Project: Painted Turkey - Paint a small and medium size Styrofoam or foam ball brown. Let dry. Glue together to form head and body. Glue on feathers, googly eyes, craft foam beak and pipe cleaner waddle, and craft foam feet! Materials Needed: small and medium Styrofoam/foam balls, brown paint, paint brush, feathers, googly eyes, orange craft foam, red pipe cleaner, scissors, craft glue and or hot glue

Wednesday, November 10, 2010

D is for Dragon!

The theme this week is the letter D
Project/learning Activity: Again, I am using an idea from the site http://www.notimeforflashcards.com/ Directions: Draw the letter D on green construction paper and cut it out. Cut out small green triangles from another shade of green paper, along with a green circle for the eye. Cut a strip of red tissue paper for the mouth/tongue/fire! Glue all items to the D to make the dragon. Add a googly eye to the middle of the green circle to complete the dragon! Materials Needed: light and dark green construction paper, scissors, glue stick, marker, red tissue paper, googly eye

Monday, November 8, 2010

D is Duck!


The theme this week is the letter D!
Project/Learning Activity: I saw this craft on the site http://www.notimeforflashcards.com/ Directions: Draw the letter D on white paper. Color the D with red, yellow and orange markers or crayons. Cut the letter D out. Glue on a triangle beak, googly eye and feathers!
Materials Needed: white paper, red, yellow and orange markers or crayons, googly eye, orange construction paper, scissors, yellow, orange and white feathers, craft glue

Wednesday, November 3, 2010

C is for Clown!

Ty's Letter C is for Clown!
The theme this week is the letter C.
Project/Learning Activity: Ty still needs some reinforcement on the letter C, so here is another C project - a CLOWN C!!! We have been up to our ears in C's this week. I am confident he will be able to recognize the letter by the end of the week!!! Directions: I cut a large C out of construction paper. Ty glued the C to another piece of construction paper. Then he decorated the C with crazy foam shapes. He added googly eyes, a smile, and big red pom pom nose. I cut a triangle shape out of scrap paper for the clown's hat, and a shoe shape out of brown scrap paper. Ty glued the hat and shoe to his clown and added more foam and pom poms!
Materials Needed: construction paper, foam shapes, pom poms, scissors, glue stick, craft glue, googly eyes, marker

Monday, November 1, 2010

C is for Caterpillar!

The theme this week is the C.
Project/Learning Activity: I have been teaching Ty his letters for the last 3 weeks. He knows T and Y and we did A and B. We started C last week, but he still needs reinforcement on it. I decided to dedicate this week to the letter C, so Ty can master it by the end of the week. I saw the idea for C is for Caterpillar on the site http://www.notimeforflashcards.com/ First, I cut a letter C out of construction paper. Ty glued the C to another piece of Construction paper. Next, he glued on googly eyes, pipe cleaner antennae and pom poms to the letter C to make his caterpillar. Addie also wanted to do a craft, so I drew the letter A for her with glue on a piece of pink construction paper and she glued pom poms to form a letter A for ADDIE!! Then she wanted to add eyes, a smile, and hands to her letter A! She was very proud of her letter A!!
A is for Addie!

Materials Needed: 2 piece of construction paper, pom poms, googly eyes, pipe cleaner, craft glue, glue stick, scissors

Wednesday, October 27, 2010

Paper Plate Jack-O-Lantern

The theme this week is Halloween!
Project: Paper Plate Jack-O-Lantern I used a large paper plate and trimmed it down using the inside circle as my guide. Using a large paper plate allows the jack-o-lantern to have a stem, but you could use a small paper plate for this project. Directions: Cut a pumpkin shape out of a large paper plate, using the inside circle as the template. Make sure to cut a stem into your shape. Rip orange and green construction paper into pieces. Stick the ripped paper onto the pumpkin using a glue stick. After the pumpkin is covered, cut out jack-o-lantern features and glue them on to the pumpkin.
Materials Needed: paper plate, orange, black and green construction paper, glue stick, scissors

Monday, October 25, 2010

Button Spiders and Glitter Spider Web!

The theme this week is Halloween!
Project: Button Spiders and Glitter Spider Web! I was inspired by Addie's shirt today. She is wearing a hand-me-down Halloween shirt from her big brother Connor. The shirt has cute black button spiders sewed , so I decided to have Ty make button spiders. He glued buttons on white card stock and drew eight legs on each spider. Then he drew a line (web) from the top of the paper to each button. Next, I drew a spider web with white glue and Ty sprinkled purple glitter over the spider web. Finally, Ty added two more button spiders to the purple web! Materials Needed: black buttons, black marker, glue, glitter

Friday, October 22, 2010

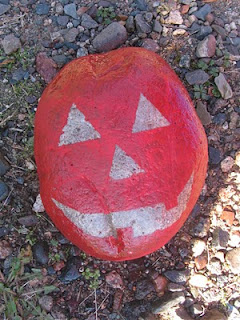
Jack-O-Lantern Rock!

Addie's Rock

Ty's Rock
The theme this week is Halloween!
Project: Jack-O-Lantern Rocks! This project was inspired by a rock painting project that my dear friend Nichole featured on her blog http://www.minimatisse.blogspot.com/ She is an amazing mom, friend, teacher and artist!! Thanks for the inspiration Nichole!! Ty and Addie loved painting their rocks and then peeling off the tape to reveal their very own jack-0-lantern rock.

Directions: Cut jack-o-lantern features from painters tape and fasten to rock. Paint the whole rock orange. Let dry, then remove tape pieces. Spray with sealant if you want to leave the rock outside. I used a polyurethane varnish spray! Materials Needed: rock, paintbrush, orange paint, painters tape, scissors, varnish spray

Tuesday, October 19, 2010

Puffy Paint Ghost!!

Ty's Ghost Connor's Ghost (not dried)
The theme this week is Halloween!
Project: Puffy Paint Ghost! I saw this craft at http://www.notimeforflashcards.com/
Directions: Mix together 3/4 cup of shaving cream, 1/4 cup of glue. Draw a ghost shape onto a paper bag or cardboard or tagboard. Spread the mixture over the ghost shape - Ty had a lot of fun spreading the mixture with his hands!! Cut a mouth shape out of black construction paper and press onto the ghost. Press googly eyes onto the ghost. Let Dry. When dry cut out the ghost! Materials Needed: paper bag/cardboard/tagboard, shaving cream, white glue, black construction paper, googly eyes, scissors, black marker

Thursday, October 14, 2010

Cardboard Tube Monster!!

The theme this week is Halloween!
Project: Cardboard Tube Monster. I saw this craft on the website http://www.notimeforflashcards.com/ I thought it was adorable, so we had to try it!! Directions: Paint the top 1/4 of cardboard tube black and the rest green. When dry cut slits in the black part for hair. Glue on googly eyes, draw mouth and nose. Poke golf tees into each lower side for the monster's neck screws!! Connor and Ty had a blast making their monsters!!
Materials Needed: cardboard tube, green, black paint, scissors, googly eyes, black marker, 2 golf tees

Monday, October 11, 2010

Thumbprint Spiders!


The theme this week is Halloween!
Project: Thumbprint Spiders! Cut white paper in half and draw black lines from the top of the paper at varying lengths down to the middle of the paper. Press thumb into black ink and make prints on the end of each line. Draw eight legs on each spider!
Materials Needed: white paper, black marker, black ink

Saturday, October 9, 2010

Monster Feet!


Connor's Monster
The theme this week is Halloween!
Project: Monster Feet! Directions: Paint toes black and the rest of the foot green. Press the painted foot onto white paper. When dry, trim around the footprint. Draw a nose and mouth. Glue on googly eyes. Cut bolts from purple construction paper and glue to the monster!
Materials Needed: green and black paint, paint brush, white paper, scissors, marker, purple construction paper, glue stick, googly eyes (Source: The Mailbox Magazine October/November 2009 - Preschool)

Ty's Monster

Tuesday, October 5, 2010

Trick-or-Treat Smell Our Feet!

Ty's Ghost Tana's Ghost Addie's Ghost
The theme this week is Halloween!
Project: Ghost Footprints - I saw this project in The Mailbox Magazine October/November 2009 (preschool). The original idea was for a bulletin board. I don't have a house full of preschoolers, so we just made individual ghosts on individual pieces of construction paper. Directions: Paint foot white and press onto black paper, sprinkle with cinnamon. When dry trim around the footprint and paste onto orange construction paper. Draw eyes and mouth. Write "Trick-or-Treat Smell my feet!" on the top of the orange paper.
Materials Needed: white paint, paint brush, black and orange paper, cinnamon, scissors, black marker

Friday, October 1, 2010

Coloring a Scarecrow!

Addie's Scarecrow Ty's Scarecrow
The theme this week is Fall!
Project: Coloring a Scarecrow! There is nothing fancy or exciting about this project - just regular old coloring. We have been working on staying patient enough to complete a full coloring page. So, I decided to print off a scarecrow and have Ty (and Addie) do their best work. Of course, Ty is more patient and has a longer attention span than 2 year old Addie, but I think they both did a great job with their scarecrows! I also had Ty cut around his scarecrow and glue it to a half sheet of orange construction paper. He did a wonderful job!!
Materials Needed: scarecrow coloring page, crayons, glue stick, scissors, construction paper

Wednesday, September 29, 2010

Pumpkin prints!

Ty's Pumpkin Prints!
The theme this week is Fall!
Project: Pumpkin Prints - Press the end of a cardboard tube into orange paint to make prints on white paper (the pumpkins). Paint green or brown stems on each pumpkin. Paint vines using green paint. Source: The Mailbox Magazine October/November 2010
Materials Needed: white paper, cardboard tube, orange, green/brown paint, paint brush

Monday, September 27, 2010

Glitter Leaves!

The theme this week is Fall!
Project: Glitter Leaves: Directions: Trace or draw leaf shapes onto fall colored paper. Mix generous amounts of glitter with white corn syrup. Crumple each leaf and flatten (optional). Brush the corn syrup mixture onto the leaves and let dry - this takes a while. When dry glue the leaves onto black paper. Source: The Mailbox Magazine
Materials Needed: fall colored paper, glitter, corn syrup, pencil, scissors, paint brush, black construction paper, glue

Friday, September 24, 2010

Wagon Wheel Handprint Fall Tree!

The theme this week is the color brown.
Project: Wagon Wheel Handprint Fall Tree - I traced Ty's forearm and hand onto white cardstock. He colored his hand and forearm print brown. Then he glued multi-colored wagon wheel pasta onto the tree with craft glue. Materials Needed: cardstock, brown crayon, multi-colored wagon wheel pasta, craft glue

Wednesday, September 22, 2010

Handprint Raccoon!

The theme this week is the color brown.
Project: Handprint Raccoon - The original idea for this craft is a raccoon puppet, but I didn't have any brown paper lunch sacks, so we just adapted the craft instead. I saw this idea in the October/November 2009 issue of The Mailbox Magazine
Directions: Trace each hand on black construction paper and trace a shoe print on brown construction paper. Cut out the tracings. Cut a front panel of a brown paper bag to size and glue it onto construction paper. Glue the hand and shoe print (the tail) cut outs to the paper bag. Then cut out simple eye, nose, and paw cutouts - I used black and brown construction paper. Glue the eyes, nose and paws onto the raccoon. Finally, draw stripes on the shoe cutout and other details on the raccoon.
Materials Needed: construction paper, black and brown construction paper, brown paper bag, scissors, glue stick, pencil, crayons/markers

Monday, September 20, 2010

Paper Bag Owl!

The theme this week is the color brown.
Project: Paper Bag Owl- Directions: I painted Ty's hands with brown paint and pressed his hands onto white paper. When the prints were dry, I cut the handprints out. Next, I trimmed a panel from a brown lunch bag and Ty glued it to a yellow piece of construction paper. Then, Ty attached yellow, sticky, foam hearts for eyes. He added black pupils on each eye with black marker. Then he glued orange, foam triangles for a beak and feet. Finally, he glued his painted handprints as wings for the owl. Materials Needed: yellow construction paper, brown paint, paint brush, white paper, scissors, brown lunch bag, yellow foam, orange foam, black marker, glue stick ***Source: The Mailbox Magazine October/November 2009***

Wednesday, September 15, 2010

Paper Plate Sun!

The theme this week is the color yellow!
Project: Paper Plate Sun - Ty(4) and Addie(2) painted these paper plate suns!
I cut triangle's around the edge of each plate to make the suns rays. Then Ty and Addie painted the cut paper plates yellow. After they were dry, Ty and Addie glued on googly eyes and they each drew a mouth and a nose! Very simple and cute! Materials Needed: paper plate, scissors, yellow paint, paint brush, googly eyes, glue, black marker

Monday, September 13, 2010

Handprint Sunflower!

The theme this week is the color yellow!
Project - Handprint Sunflower. Paint your child's hand yellow and press on white paper 4 times in a circular pattern ( you will have to re-paint the hand a couple of times). Draw a stem on green construction paper and have child cut it out. Glue the stem onto the white paper. Cut small black triangle out of black construction paper. Have child press the small triangle onto center of wet handprints (these will act as the seeds for the sunflower). Materials Needed: white paper, yellow paint, paint brush, black construction paper, green construction paper, pencil, scissors, glue stick

Wednesday, September 8, 2010

Handprint Caterpillar!

Addie's unfinshed caterpillar (she needs to draw a face!) Ty's caterpillar
The theme this week is the color green!
Project: Handprint Caterpillar - Trace hand on light green and dark green paper. Make two handprints for each color. Trace and cut a circle on light green paper for the caterpillar's head. Glue the 4 handprints in line, right next to each other - fingers down. Glue the head beside the handprints so it resembles a caterpillar head. Attach rectangular scraps to the head for antennae. Draw eyes, nose mouth and any other details. Source: The Mailbox Magazine Preschool October/November 2009. Materials Needed: construction paper, dark and light green construction paper, glue stick, scissors, pencil, crayons or markers

Friday, September 3, 2010

Cardboard Tube Apple!

The theme this week is the color red!
Project: Cardboard Tube Apple. I saw this on the blog http://www.notimeforflashcards.com/ Directions: Cut a cardboard tube into sections. Cut another section of the tube as a stem for the apple. Paint the sectioned cardboard tube red and the stem green. Attach the stem either with glue or by cutting a slot in the top and inserting it in the slot. Materials Needed: cardboard tube, red, green paint, glue and or scissors, paintbrush

Tuesday, August 31, 2010

Lobster Hand and Footprints!

Ty's Lobster Connor's Lobster
The theme this week is the color red.
Project: Lobster Hand and Footprints. I saw this cute project on the blog www.adventures-in-mommyland.blogspot.com
Directions: Paint 1 foot red and press onto white paper. Paint both hands red and press onto paper above the heel of the footprint. Paint red stripes off both sides of footprint. Let dry. Glue on googly eyes. Draw mouth, nose and antennae with black marker. Materials Needed: white paper, red paint, paint brush, googly eyes, black marker

Monday, August 30, 2010

Masks are so much fun to make!

"Masks are so much fun to make." I heard this many times today as we were making these masks. My cousin and her 3 kids came over to play this morning. They love to do projects just like my kids. The two older kids decided we needed to make masks. I traced an old tiger mask onto colored foam and let the kids go to town with foam, buttons, feathers . . . and anything else they could find. Addie made one too, but she didn't make it into the picture with the other kids. The older kids even cut out their own masks! Materials Needed: foam, buttons, feathers, markers, scissors and party hat string, and anything else!